There's a particular kind of noise a garage door makes when something is wrong with a hinge. Not the typical grinding of a dry roller or the pop of a spring that needs lubrication. This is more like a creak that catches slightly - almost rhythmic - happening at the same point in the door's travel every single time. If you've heard it, you know exactly what I mean.
Most people ignore it for months. A few ignore it for years. And then one day the door binds on the way up, or a panel starts pulling at an angle, and suddenly a relatively simple hinge replacement has turned into a conversation about panel damage and whether the door is still worth repairing.
Hinges are not glamorous garage door hardware. They don't get written about the way springs do. But they're the reason a sectional door can fold onto itself as it travels up the track - and when they fail, they fail in ways that affect everything around them.
What garage door hinges actually do
Most people assume hinges just connect two panels. That's part of it. But on a sectional garage door - the kind that travels up the track in sections - the hinges are also carrying rollers that guide the door through the curved section from vertical to horizontal. End hinges, the ones at the very edges of each panel junction, hold the roller stem directly. Middle hinges connect the panels without rollers.
Every time the door cycles - and if you're using it four times a day, that's over a thousand cycles a year - those hinges flex slightly at the panel junction. Over several years and tens of thousands of cycles, the metal fatigues. The screw holes elongate and loosen. The hinge plate can crack. Rust starts in the fold lines where moisture collects.
The whole system is designed to handle this. But it requires periodic inspection and replacement before the failure becomes structural rather than mechanical.
The numbering system nobody tells you about
This one trips up almost everyone doing their first hinge replacement, and it's worth understanding before you go buy anything.
Every garage door hinge has a number stamped or engraved on its face - typically #1, #2, or #3 for residential doors. That number indicates the hinge's position on the door, counted from the bottom panel up. The hinge between the bottom and second panel is #1. Between the second and third panels is #2. And so on.
The reason this matters: the hinges aren't all the same shape. The angle at which the panels must flex changes as the door transitions from vertical to horizontal along the curved section of the track. A #1 hinge installed in the #2 position (or vice versa) will bind during travel, stress the panels unevenly, and fail faster than either would in the correct position.
Always check the number on the hinge you're replacing. If you're bringing an old hinge to the hardware store to match it, that's the right instinct - take the old hinge with you rather than trying to describe it.
There's also a gauge difference worth knowing. Standard builder-grade residential hinges are often 18-gauge steel - relatively thin. A 14-gauge hinge is meaningfully more robust and costs only slightly more. If you're replacing hinges anyway, step up to 14-gauge wide body. You'll do the job less often.
Signs your hinges need replacing
Noise that's specific to a position on the door's travel - not a general grinding, but a creak or click that happens at the same moment every time. Often this is a hinge flexing past the point where its metal can do so smoothly.
Visible rust on the hinge face or in the fold - surface rust that wipes off is cosmetic. Rust that has pitted the metal surface or flakes when you press it means the structural integrity is compromised. That hinge needs to come out.
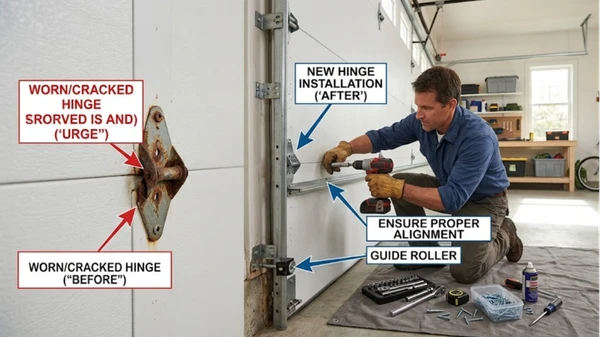
Screw holes that are elongated or stripped - if the screws that hold the hinge to the panel door stile turn without biting, the holes have worked loose from years of micro-movement. A stripped hole doesn't hold a hinge; it holds an illusion of a hinge.
Cracks in the hinge plate - visible cracks, especially along the fold line, are a failure in progress. Replace immediately.
The door runs crookedly or binds during travel - sometimes alignment issues come from springs or tracks. But a bent or failed hinge can cause a panel to sit slightly out of plane, which shows up as binding at the same point in every cycle.
Panels that feel slightly loose relative to each other - if you grab adjacent panels and they shift against each other in a way they shouldn't, the hinge connecting them has failed structurally.
How to replace them - and how not to
Before anything else: unplug the garage door opener. Not just turn it off - unplug it from the outlet. If someone else is home and doesn't know you're working on the door, an opener activation while your hands are in the hinge assembly is a serious injury risk. This step is not optional.
Work with one hinge at a time. This cannot be overstated. A sectional door with multiple hinges removed simultaneously will sag, shift, and potentially buckle. Remove one hinge completely, install the replacement, confirm it's seated and fastened, then move to the next one.
Do the work with the door in the closed position for middle hinges. This reduces the spring tension acting on the panels and gives you more control over how the panels move as you remove the hinge. Some guides suggest working with the door up - that works too, but requires securing the door against movement with C-clamps on the tracks, and the panels will sag more once the hinge is removed.
What you need: A cordless impact driver or a 7/16" socket wrench (7/16" is the standard fastener size on most residential garage door hinges), the replacement hinges, and new self-tapping Tek screws if the old holes are worn.
The removal process: find all the screws on the hinge - typically two to four - and remove them. Do not force stripped screws. If a screw spins without backing out, drill it out rather than forcing it and damaging the door panel's stile. When the fasteners are out, the hinge slides off the panel stile.
Installing the replacement: position the new hinge over the same bolt holes where possible. If the holes are stripped or elongated, the new fasteners need to bite into fresh material - which sometimes means offsetting the hinge slightly or using a slightly larger screw. Fasten the top and bottom of the roller carrier first, then the remaining screws. Don't over-tighten Tek screws into door panel stiles - you're threading into sheet metal, and overtightening strips the hole immediately.
After every hinge: manually cycle the door slowly by hand before plugging the opener back in. Feel for any binding, listen for anything that sounds wrong. If it travels smoothly, move to the next hinge.
The hinge you should never touch yourself
The bottom roller bracket - the bracket at the very bottom corner of the door where the lift cable attaches - is in a completely different category from every other hinge on the door.
This bracket is under direct tension from the garage door spring. On a torsion spring system, that tension can exceed several hundred pounds even with the door closed. Removing this bracket without first properly relieving spring tension is one of the more reliable ways to seriously injure yourself in a garage door repair scenario. Cables snap back. Brackets become projectiles.
Leave the bottom roller brackets to a professional. Every other hinge on the door is genuinely DIY territory with basic tools and reasonable care. That one is not.
When to replace vs. when to call someone
Most hinge replacements on the middle and end hinges are reasonable DIY work. The parts are inexpensive - 14-gauge wide-body residential hinges run $4 to $12 each, and a full set for a double-car door is under $60. The tools are basic. The process is methodical but not technically demanding.
Where to call someone instead: if you find multiple hinges failed or failing simultaneously, that's a sign the door has been running compromised for a while, and the tracks, rollers, and panel edges likely need a full inspection. If any panel edges are bent or cracked at the hinge holes, the panel itself may need replacement, which changes the scope of the job. And if anything about the spring system looks abnormal - a broken spring, loose cables, spring mounting hardware showing damage - stop and call before continuing.
Routine hinge replacement is one of the better-value maintenance tasks on a garage door. The parts cost almost nothing. The skills required are genuinely basic. And catching a failing hinge before it damages adjacent panels saves a repair bill that can be ten times larger.
DoorFixy can handle hinge inspection, replacement, and full door tune-ups - or just confirm whether what you're seeing is a hinge issue or something further up the system.
More practical maintenance guides on the DoorFixy blog - honest answers for homeowners who want to understand what's happening with their garage door.