About two months after we moved into our current house, my garage door started making a sound on the way up that I can only describe as a brief scrape - not loud, not consistent, but unmistakably there at the same point in the door's travel every single time. Right about five feet up.
I ignored it for six weeks. This is not the part of the story where I recommend ignoring things.
By the time I actually looked at it, the roller at that section had worn a visible groove into the track wall from thousands of passes against a bent spot I could have straightened in twenty minutes when the issue first appeared. The groove had gotten deep enough that the roller was now catching slightly rather than rolling smoothly, which added up to a different repair conversation entirely.
Garage door track adjustment is one of the more accessible DIY maintenance tasks on a door - most track misalignment problems involve loosening brackets, repositioning, and re-tightening, rather than anything complex. The window for that simple version closes when you ignore the symptoms long enough that secondary damage sets in.
Here's how to work through it.
Understanding the track system before you touch anything
A sectional garage door uses two vertical tracks on each side of the opening - the door travels up them as it opens - that curve through a radius section into horizontal tracks extending back along the ceiling. The vertical sections are plumb (straight up and down). The horizontal sections have a slight downward slope toward the back of the garage - about 1/8 inch per foot - which helps gravity keep the door in the open position.
Rollers attached to each door panel ride inside these tracks continuously. The gap between the roller and the track wall on each side should be consistent and specific: approximately 3/8 to 1/2 inch on each side of the roller. Too tight and the roller drags. Too loose and the door shifts laterally and can derail.
The tracks themselves are held in place by brackets - jamb brackets bolting the vertical section to the door frame wall, and ceiling brackets holding the horizontal sections overhead. Every bracket is a potential source of gradual drift. Vibration from thousands of door cycles works fasteners loose over time.
Diagnosing which type of track problem you have
Before adjusting anything, spend five minutes observing the door from inside the garage while running it through two or three full cycles. You're listening and watching for specific behaviors.
Scraping or grinding at a specific point in travel - this is a local problem: something wrong at a particular location on the track. Could be a bend in the track at that height, a loose bracket that's shifted the track at that point, or debris built up at that location. The consistency is the tell - if the sound happens at the same spot every time, it's location-specific.
General grinding throughout the travel - this suggests either inadequate lubrication (the tracks shouldn't be lubricated, but the rollers should be), worn rollers running on dry bearings, or a track that's shifted out of parallel over a longer section. If the entire travel sounds rough rather than one specific point, it's a system-wide issue.
Door visibly tilting - one corner lower than the other as the door rises or descends - this can be a cable issue (one cable has slipped or frayed more than the other) or a track issue where one side has shifted relative to the other. Run the door up slowly and watch whether the tilt is consistent from the moment of motion or develops as the door rises. Consistent tilt suggests asymmetric tracks; developing tilt as it rises often suggests cable or spring tension asymmetry.
Binding or stopping mid-travel - a door that jams or jerks at a specific height usually has a dent or significant bend in the track at that location, or a roller that's partially failed and is catching. This is the scenario I described with my own door - ignoring a scrape until the groove was deep enough to catch.
Rubbing against the door frame at sides - visible scuffing on the door edge or the frame stop molding means the track has shifted too close to or too far from the door edge. The door should clear the stop molding with a consistent gap on each side.
What you can safely adjust yourself
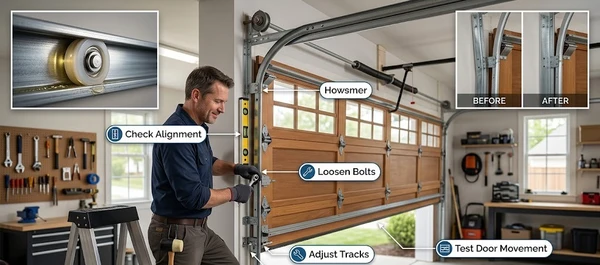
Loose bracket tightening - the most impactful maintenance task and the easiest. Every mounting bracket on the vertical and horizontal tracks can drift from vibration. Grab each bracket firmly and push against it - any play means the bolt needs tightening. A socket wrench and a 7/16-inch socket handles most residential garage door bracket bolts. Retighten anything that has movement, check that the track is in the correct position before you tighten, and confirm the alignment didn't shift in the process.
Minor vertical track repositioning - if a vertical track section has drifted out of plumb (use a level to check - the bubble should be centered), loosen the jamb bracket bolts slightly, reposition until the level reads correctly, and retighten. Work from the bottom bracket up, getting each section plumb before moving to the next.
Correcting the track-to-door gap - if the door is rubbing on the frame on one side, the track on that side needs to move laterally. Loosen the lower bracket bolts, shift the track inward or outward until the gap between the door edge and the stop molding looks even on both sides (target: 1/4 to 1/2 inch of consistent gap), then retighten. Check by running the door manually through a full cycle before reconnecting the opener.
Horizontal track slope adjustment - the horizontal sections running along the ceiling should slope slightly downward toward the back. If the door drifts toward the closed position when it's supposed to be resting open, the slope may be level or upward rather than the correct slight downward angle. Loosen the ceiling brackets at the back of the horizontal section, add a slight downward pitch (about 1/8 inch per foot), and retighten.
Cleaning the tracks - not a track adjustment per se, but a direct influence on how the door travels. Built-up grime, dried lubricant residue from past applications on the track (which is a mistake - don't lubricate the tracks), and debris at the bottom of the track channels create drag and resistance. Wipe the track channel interior with a dry cloth. For heavy buildup, a rag dampened with a mild household cleaner, then dried. The tracks should be clean and dry.
The radius section - handle carefully
The curved section connecting the vertical and horizontal tracks is where most DIYers should stop. The curve has to be precisely right for the rollers to transition smoothly from vertical to horizontal travel. A radius that's been bent, whether from impact or from someone trying to adjust it incorrectly, creates a bump or catch that rollers fight on every cycle.
A slight bend in the radius can sometimes be addressed by loosening the track mounting and allowing the track to return to its natural curvature under spring tension. A more significant bend typically requires track replacement rather than adjustment - the metal has been stressed past the point where it will return to the correct curve on its own.
If the scraping or catching is specifically at the radius section (approximately where the door is about three-quarters open), don't try to force it straight. Replace the curved section.
What requires a professional
A few situations where self-adjustment should stop:
If you've adjusted the vertical tracks and they keep drifting out of alignment within a few weeks, the bracket mounting is failing - either the wood framing behind the bracket has softened or been damaged, or the bolt holes have elongated. The bracket needs to be repositioned to fresh framing material, which requires knowing what's solid behind the wall surface.
If the garage door is off the track entirely - a panel has pulled out of the track on one side - do not try to run the opener to get it back on. Manually supporting the door while re-seating the roller in the track is manageable for one side if you know what you're doing; doing it while spring tension is engaged is not safe without proper technique and a helper.
If the problem appears to be in the bottom section of the vertical track - the area near the bottom bracket where the lift cable attaches - stop. The bottom bracket is under direct cable tension connected to the spring system. Adjusting track in this area without first safely relieving the spring tension is a meaningful safety risk.
And the horizontal tracks, while not under spring tension, hang from ceiling brackets that may be anchored into ceiling joists or engineered lumber - if a ceiling bracket is pulling away from the ceiling rather than just being loose, understanding what it's anchored into and whether that anchorage is compromised is important before putting weight on the repair.
After adjustment: test manually first, then with the opener
After any track work, always test the door manually before reconnecting the opener. Pull the emergency release cord, then run the door by hand through a full cycle - all the way up, all the way down, slowly enough that you can feel and hear any catch or hesitation. If it travels smoothly by hand, reconnect the opener and run two automatic cycles while watching and listening.
A door that runs cleanly on manual but scrapes with the opener suggests the opener's force settings are compensating for something - running the door faster or with more force than a slow manual test reveals. Run several cycles and listen for anything that doesn't sound right before assuming the adjustment is complete.
The garage door track adjustment that works holds up across multiple cycles. If the problem comes back within a week of tightening brackets, something deeper is driving the repeated misalignment.
DoorFixy handles full track diagnostics, alignment, and replacement - including the sections and situations where the self-adjustment path ends.
More on the DoorFixy blog - garage door repair guides, maintenance schedules, and practical information for homeowners who want to understand what they're dealing with.