Last January I stood in my garage at 7 AM getting something out of the chest freezer and noticed my breath was fogging in a way that seemed excessive. The garage was attached to the house. The furnace had been running all night. Something wasn't right.
Took me about four minutes to find it - a section of weatherstripping along the side of the door that had gone brittle and cracked, probably sometime in October when the temperatures first dropped hard. Half an inch of open gap running about two feet up the left side of the door frame. Cold air pouring through it like a vent.
Forty dollar fix. But I'd been heating the neighborhood for three months without knowing it.
That's how garage door weatherstripping fails. Quietly, gradually, and expensively.
What weatherstripping actually is - and where it lives
There isn't just one seal on a garage door. There are four distinct zones, and each one can fail independently.
The bottom seal is the one most people know about - the rubber or vinyl strip attached to the bottom edge of the door itself. When the door closes, it presses down against the floor and creates a barrier against cold air, water, and anything small enough to fit under a gap. It's also the one that takes the most abuse. Every time the door closes it gets compressed. In freezing climates it can actually freeze to the floor overnight and tear when the door opens in the morning. Most bottom seals need replacement every five to seven years under normal use, sooner in harsh climates.
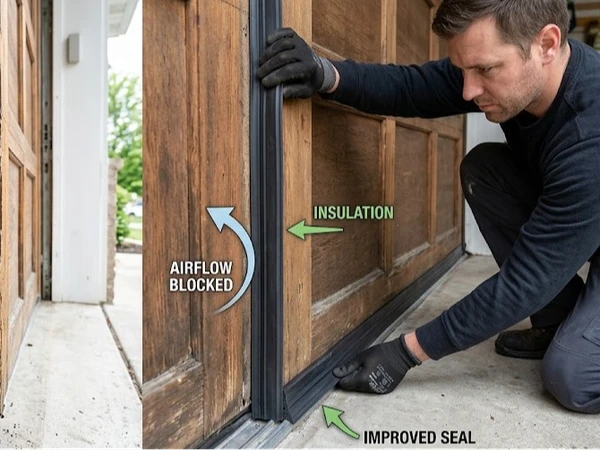
The side seals - sometimes called jamb seals - run up the vertical sides of the door frame. These press against the door panel edges when the door is closed. They're often overlooked because the failure is subtle: the seal flattens out over years and stops making solid contact. Wind-driven rain gets through. Cold air seeps in at the edges. You feel it before you see it.
The top seal - a strip running across the header at the top of the opening - works the same way as the side seals. Fails the same way. Gets forgotten the same way.
The threshold seal is different from the others. Instead of attaching to the door frame, it attaches to the garage floor itself, creating a raised barrier that the bottom seal closes against. Particularly useful on uneven floors where the door can't make consistent contact across its full width. If you've replaced the bottom seal twice and still have a gap in the middle or at one corner, an uneven floor is probably the real problem - and a threshold seal is the fix.
How to know if yours needs replacing
There's a simple test that takes about ninety seconds.
Go inside the garage during the day and close the door. Let your eyes adjust. Look along the bottom edge, then up both sides, then across the top. Any daylight coming through means air is coming through. A strip of light at the bottom corner is common. A faint glow along one side of the frame is easy to miss - walk along it slowly and let your eye catch it.
If the light test passes, run your hand slowly along each seal with the door closed. You're feeling for moving air. Even small drafts are detectable this way on a cold or windy day.
Then check the physical condition of the seals:
Cracked or brittle rubber or vinyl - seals dry out and crack, especially in climates with harsh summers followed by harsh winters. A cracked seal that looks mostly intact is still failing.
Hardened or completely flat - the material should compress slightly when you press it. If it feels rigid and doesn't spring back, it's lost its ability to form a seal.
Tears or missing sections - obvious, but sometimes the damage is behind a part of the frame you don't look at closely. Check the full length of each strip.
Mouse or insect activity inside the garage - if something is getting in and you can't figure out where, check the seals. Mice can squeeze through a gap you'd barely call a gap.
Costs - DIY vs. professional
Weatherstripping is genuinely one of the more DIY-friendly garage door jobs. The materials are inexpensive, the tools are minimal, and the stakes if you do it slightly imperfectly are low.
DIY material costs:
- Bottom seal: $20 to $60 depending on door width and material
- Side and top seal kit: $30 to $70 for a full perimeter set
- Threshold seal: $30 to $80
Total to seal a complete two-car garage door: somewhere between $80 and $150 in materials, a few hours of your Saturday, a utility knife, a screwdriver, and possibly a staple gun.
Professional installation:
- Bottom seal: $80 to $150 including parts and labor
- Full perimeter plus bottom: $150 to $300
The professional case makes sense if: your door has alignment issues that are causing the seal to fail prematurely (a professional will catch this), you have a custom or oversized door with non-standard seal profiles, or you simply don't want to spend a Saturday afternoon on your knees by the garage floor. No judgment there.
When weatherstripping isn't enough
Replacing worn seals solves the sealing problem. But sometimes the door has a bigger underlying issue that a new seal can't fix.
Uneven floor - If your concrete floor has settled, cracked, or was never perfectly level, no bottom seal will close consistently against it. A threshold seal handles minor unevenness. Major floor issues might need leveling work.
Door alignment - A garage door that's out of square, bent, or sagging at one corner won't seat evenly against the frame no matter how good the seals are. If the seal is new but you still have a gap that shifts depending on where you look, the door itself needs adjustment.
If you're replacing seals for the second time in a few years on the same door, something structural is probably driving the premature wear. Worth having someone look at the full system.
One thing to do right now
Go close your garage door and stand inside with the lights off for thirty seconds. If you can find daylight, you can find your problem. Most weatherstripping failures are visible before they're expensive - the issue is that nobody looks.
Need help with weatherstripping replacement or a full garage door tune-up? DoorFixy handles everything from a quick seal replacement to a full inspection of your door's sealing and insulation performance.