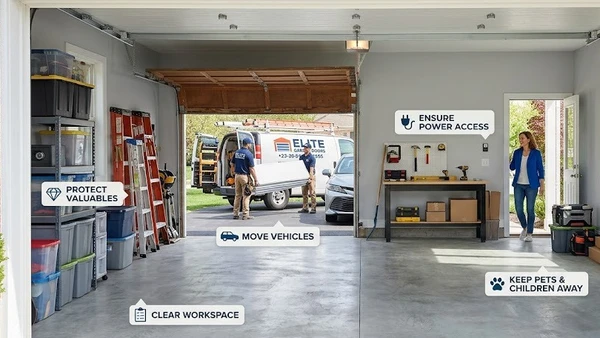
The crew that replaced my parents' garage door last spring showed up at 8:30 AM. By 8:35, the lead installer was standing in the middle of the garage, hands on his hips, looking at three bikes hanging on the left wall, two kayaks on ceiling hooks that ran directly across the track path, and a workbench that had been built against the right side wall close enough to the frame that he needed to angle past it to reach the track mounting point.
My parents had moved the cars out. They thought that was the preparation.
It wasn't a disaster. But it cost them about 45 minutes of rearranging before any installation work could begin. The crew was polite about it. They've seen it hundreds of times.
The single most impactful thing you can do before a garage door installation is arrive at the appointment having thought about the garage the way the installer sees it: as a job site, not a storage space. Here's what that means in practice.
The workspace the crew actually needs
The immediate work zone for a garage door replacement is larger than most homeowners expect. The crew needs:
Clear floor space along the full width of the door opening. They're going to lay the new door panels on the floor before lifting them into position - that's how sectional door installation works. A 16-foot double door means 16 feet of floor space that needs to be unobstructed. Not just walkable. Actually clear, with enough room to lay panels flat.
Ceiling clearance along the track path. The horizontal tracks run from the door opening back toward the center of the garage. Any shelving unit, ceiling-mounted storage rack, bike hook, or light fixture in that path needs to move. A track that can't be properly mounted because a shelf is in the way either gets mounted incorrectly or costs time while someone finds a temporary storage solution. Neither is ideal.
Wall access on both sides of the opening. The vertical tracks mount to the door frame side walls, and the crew needs to work along those walls for track installation, spring mounting, and opener bracket placement. Three feet of clearance on each side of the door is the practical minimum.
Ladder access to the ceiling at the center of the garage. The opener motor mounts to the ceiling framing, and the crew needs overhead access to find joists and anchor the front mount bracket. A chest freezer parked directly under where the opener needs to go is a problem.
Clearing the garage for door replacement is more thorough than clearing it for most things you might do in that space. The whole width, the full track path along the ceiling, and the walls on both sides of the opening. Do this the evening before, not the morning of, so you can take your time moving things without the crew standing there waiting.
Checking the electrical situation before the crew arrives
This is the preparation step that creates the most awkward surprises on installation day.
A garage door opener requires a dedicated 120V outlet within reach of where the motor unit mounts on the ceiling. That's typically 4 to 6 feet back from the door opening, centered, attached to ceiling framing. If there's an outlet in that area and it's working, you're fine. If there isn't one, you need to handle this before installation day.
Getting an electrician out to add an outlet if one doesn't exist is a job that needs to be scheduled separately, before the garage door installation. A garage door company isn't going to add an outlet for you - that's electrical work requiring its own license and permit. The installation crew arriving to install an opener in a garage with no power source will either leave without completing the opener installation or improvise a solution that you'll have to redo properly anyway.
Test the outlet. Don't assume it works because it's there. Plug something in and verify it's live. An outlet that was wired into a circuit that was subsequently tripped or modified may be dead without any visual sign.
Also note where the circuit breaker for the garage is located. The installer will probably ask, particularly if they need to reset something or if the outlet is on a shared circuit. Having the answer ready saves the brief but annoying moment of hunting for it during the job.
Documentation to have ready
This sounds like homework, but each of these items prevents a specific delay:
The measurements of the door opening. Width and height, measured at multiple points. Most installation companies take their own measurements during the site visit, but having your own numbers lets you quickly verify that the door being delivered matches what was quoted. Errors happen, and catching a wrong-size door before it's off the truck is infinitely better than catching it after.
The product documentation for the new door if it's been ordered for your specifications - insulation rating, wind code certification if applicable, model number. If your jurisdiction requires a permit, or if your HOA approval was contingent on specific door specifications, having that documentation accessible speeds up any conversation about compliance.
Any HOA approval in writing. If your homeowners association required approval for the new door, have the written confirmation accessible on installation day. This matters specifically if a neighbor or management company questions the installation in progress - you want to be able to show approval, not describe it.
Photos of the current door setup before removal. Take these yourself before the crew starts. The existing track layout, the spring setup, the opener mounting position - having a before-photo reference is useful if questions come up later about what was there and how it compared to the original spec.
What to do about children, pets, and other complications
Garage door installation involves significant noise - impact tools, metal on metal, the removal of components under spring tension that make sounds when they're released. It also involves a garage that's not a safe space for unsupervised children or animals for the duration of the job.
Keep children out of the work area. Not "supervised in the garage" - out of the garage entirely. The combination of heavy panels being moved, springs under tension being released, and workers who need to move quickly without worrying about who's in the path is not an environment for kids. This applies to older children who are naturally curious about the mechanical process - the work area is not the place to watch.
Pets that are normally in a garage-adjacent space need to be secured elsewhere. Dogs that react to strangers, tools, and unfamiliar noises in their territory are a safety hazard and a distraction. The crew is polite about it, but a dog that's barking at the work area from inside the garage forces everyone to work around an unpredictable element. Crate the dog or put it in a room inside the house for the duration.
If anyone in the household is on a schedule that requires garage access during the installation window - the car has to leave at a specific time, a delivery is expected - communicate this to the installer when you book, not on the day. A garage mid-installation can't always be interrupted for a vehicle exit without losing an hour of work. Plan the installation for a day when no one needs the garage during the estimated window.
Communicating known issues before the crew arrives
The best time to tell the installer about a problem with your garage is before installation day. Not when they're standing in the driveway about to start.
Known issues that are worth flagging in advance: a floor that's uneven at the threshold (relevant for weatherstripping contact and freeze-to-floor risk), any previous water damage or rot in the frame that may not be visible externally, a ceiling that's lower than standard headroom if you're adding an opener, any existing wiring or plumbing running across the ceiling in the track path, and any previous non-standard installation that the current door is part of.
Installers deal with all of these regularly. The issue isn't the problem itself - it's being surprised by it mid-job when parts of the solution might need to be pre-ordered or when the schedule needs to adjust. A flag before installation day lets them come prepared.
The morning of installation
The day itself requires less preparation than the day before, but a few things make it go better:
Have the garage door area finalized - nothing that needs moving should still need moving. If you moved everything the night before, do a quick walk-through in the morning to confirm nothing migrated back.
Make sure the access to the garage is clear for the truck. Installation crews typically have a truck long enough to need the full driveway, and they'll need to unload door panels - which can be twelve feet long - without obstacles.
Be reachable. Have your phone on you and plan to be able to respond quickly if the crew calls or comes to find you. Decisions about discovered frame damage, unexpected track configurations, opener compatibility - all of these occasionally come up during a job and require quick answers to avoid extended delays.
If you're having the old door disposed of by the company (most include this in the service), make sure nothing is stored on or leaning against the door that you want to keep. The old door leaves with the crew.
One thing worth doing that most people skip
Walk through the garage yourself, a week before the installation, and pretend you're the installer seeing it for the first time. What's in the track path? What's on the walls adjacent to the door frame? Is the ceiling accessible at the opener mounting position? Is there anything that you'd have to move to stand at the track mounting positions on both sides?
That walk-through, done once with a critical eye, usually reveals two or three things that need to move that you wouldn't have thought of otherwise. Moving them before installation day takes twenty minutes. Moving them the morning of, while the crew is watching, takes longer and starts the job on a slightly awkward note.
DoorFixy sends a preparation checklist with every scheduled installation and will flag any known complications during the pre-installation site review.
More on the DoorFixy blog - garage door installation guides, buying advice, maintenance information, and practical answers for homeowners.