Measuring for a new garage door seems like it should be simple. Width and height, right?
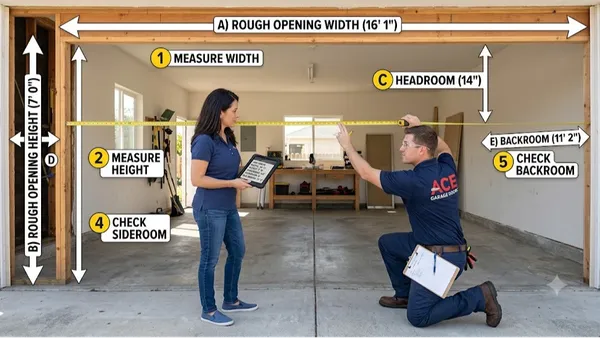
Not quite. There are five measurements that matter, and getting any of them wrong means the door you ordered either won't fit or won't operate correctly. The headroom measurement trips up more people than any other - it determines whether standard hardware works or whether you need a special low-clearance kit, and that affects both cost and installation.
Here's how to do it right, in the right order.
What You'll Need
A metal tape measure - cloth ones stretch and give inaccurate readings over longer spans. A pencil and paper or your phone to record numbers. A stepladder for the headroom measurement. A helper makes it easier but isn't strictly necessary.
Measure everything twice. Write down both readings. If they match, you're good. If they differ by more than a quarter inch, measure a third time.
Measurement 1: Opening Width
Start at the widest point of the garage door opening - the actual gap in the wall, not the door that's currently in it.
Measure horizontally from the inside of the left jamb to the inside of the right jamb. Do this at three heights: near the floor, at the middle, and near the top. Write down all three.
If all three readings are the same, your opening is square. If they vary - which happens in older homes where things have settled - use the smallest measurement. A door sized to the smallest width will fit; a door sized to the largest will bind on the narrow side.
Standard residential widths are 8, 9, 10, 12, 14, 15, 16, and 18 feet. If your measurement falls close to one of these, the opening was likely built for that standard size. If it's between standard sizes by more than half an inch, you may need a custom door - which costs more and takes longer to manufacture.
Measurement 2: Opening Height
Measure vertically from the floor to the highest point of the opening - again, the actual opening, not the existing door.
Do this at both the left side and the right side of the opening. If the floor is uneven (common in older garages where the concrete has settled or cracked), the two measurements may differ. Note both.
Standard residential heights are 7 and 8 feet, with 7 feet being by far the most common. Taller vehicles - full-size trucks, vans, SUVs on lift kits - may need 8-foot or even 9-foot doors. If you're replacing a door and upgrading for vehicle clearance at the same time, now is the time to address it.
One thing that catches people off guard: the door panel height and the rough opening height aren't always the same. The door is usually sized to the opening, with weatherstripping filling the gap at the top. Your installer will confirm this, but it's worth knowing.
Measurement 3: Headroom
This is the one most people forget, and it matters more than they expect.
Headroom is the vertical distance from the top of the door opening to the ceiling directly above it - or to whatever obstruction is there first (a beam, ductwork, a structural member).
Measure from the top of the opening straight up to the lowest point of the ceiling or obstruction. Do this at the center of the opening and at both sides.
Why it matters: Standard garage door hardware - the horizontal tracks that run back along the ceiling - requires a minimum of 10 to 12 inches of headroom above the opening. If you have less than that, standard hardware won't work. You'll need a low-clearance track kit or a high-lift conversion, both of which add cost.
If you have between 10 and 12 inches: get the exact measurement and confirm with whoever you're ordering from what the minimum headroom requirement is for that specific door and hardware combination. It varies.
If you have less than 10 inches: you need low-clearance hardware, definitely. Flag this upfront - it affects the quote.
If you have 15 inches or more: you're in good shape for standard hardware and have some flexibility.
Measurement 4: Side Room
Side room is the horizontal distance from the edge of the door opening to the nearest wall or obstruction on each side.
Measure from the inside edge of the left jamb to the left wall (or nearest obstruction). Then the same on the right side.
Standard track hardware needs a minimum of 3.75 inches of side room on each side. Many installers prefer 5–6 inches to have working room.
If you have less than 3.75 inches on either side, you need special low-clearance or jamb-bracket hardware. If your opening goes almost wall-to-wall with almost no side room, flag this before ordering - it's solvable but needs to be accounted for.
Measurement 5: Backroom (Depth)
Backroom is the depth of your garage from the opening to the back wall - or to whatever is back there first. This determines how much of the door can travel horizontally along the ceiling when open.
Measure from the front wall (where the door opening is) straight back to the rear wall. Subtract the headroom you measured - that gives you the usable track run.
As a general rule, you need backroom equal to the door height plus 18 inches for standard hardware. So a 7-foot door needs roughly 8.5 feet of backroom. If your garage is shallow - a tight single-car garage attached to a townhouse, for example - verify this before ordering.
If you're adding an opener, you need an additional foot or so beyond the standard backroom requirement for the opener carriage rail.
Record Everything in One Place
Before you call anyone or order anything, write these down together:
- Opening width (smallest measurement if it varies)
- Opening height (left side and right side)
- Headroom (center and both sides - use the smallest)
- Side room (left side and right side)
- Backroom depth
If you measured twice and recorded carefully, you now have everything a garage door supplier or installer needs to spec the right door and hardware for your opening. Any quote that doesn't ask for at least width, height, and headroom is a quote from someone who hasn't thought it through.
A Few Things Worth Checking While You're At It
Note any obstructions in the ceiling track path. Light fixtures, pipes, ductwork - anything that hangs down from the ceiling in the track zone needs to be moved or accommodated. Better to flag this before installation than find out during it.
Check the floor slope. Garage floors are poured to slope toward the door for drainage - typically a quarter inch per foot. A significant slope affects how the bottom seal sits and whether it seals evenly. Extreme slopes may need a threshold or a custom bottom seal. Level a straight edge across the floor in front of the opening and check.
Photograph the existing door hardware. Before anything gets removed, photograph the spring setup, the cable drums, the track brackets. If there's anything non-standard about your current installation, having photos means whoever installs the new door understands what was there before.
DoorFixy can do the measuring for you as part of a free assessment - and we'll catch anything unusual about your opening before it becomes an installation-day surprise. Reach out to schedule.